One Room Challenge Week 4 – Trim, Paint And Other Progress

How did that happen? Suddenly it’s week 4 of this makeover challenge. Yikes. That means we have a little less than 2 weeks left to finish up this bathroom, since I need to take photos and write the final post all before the reveal date – May 12. Game on!

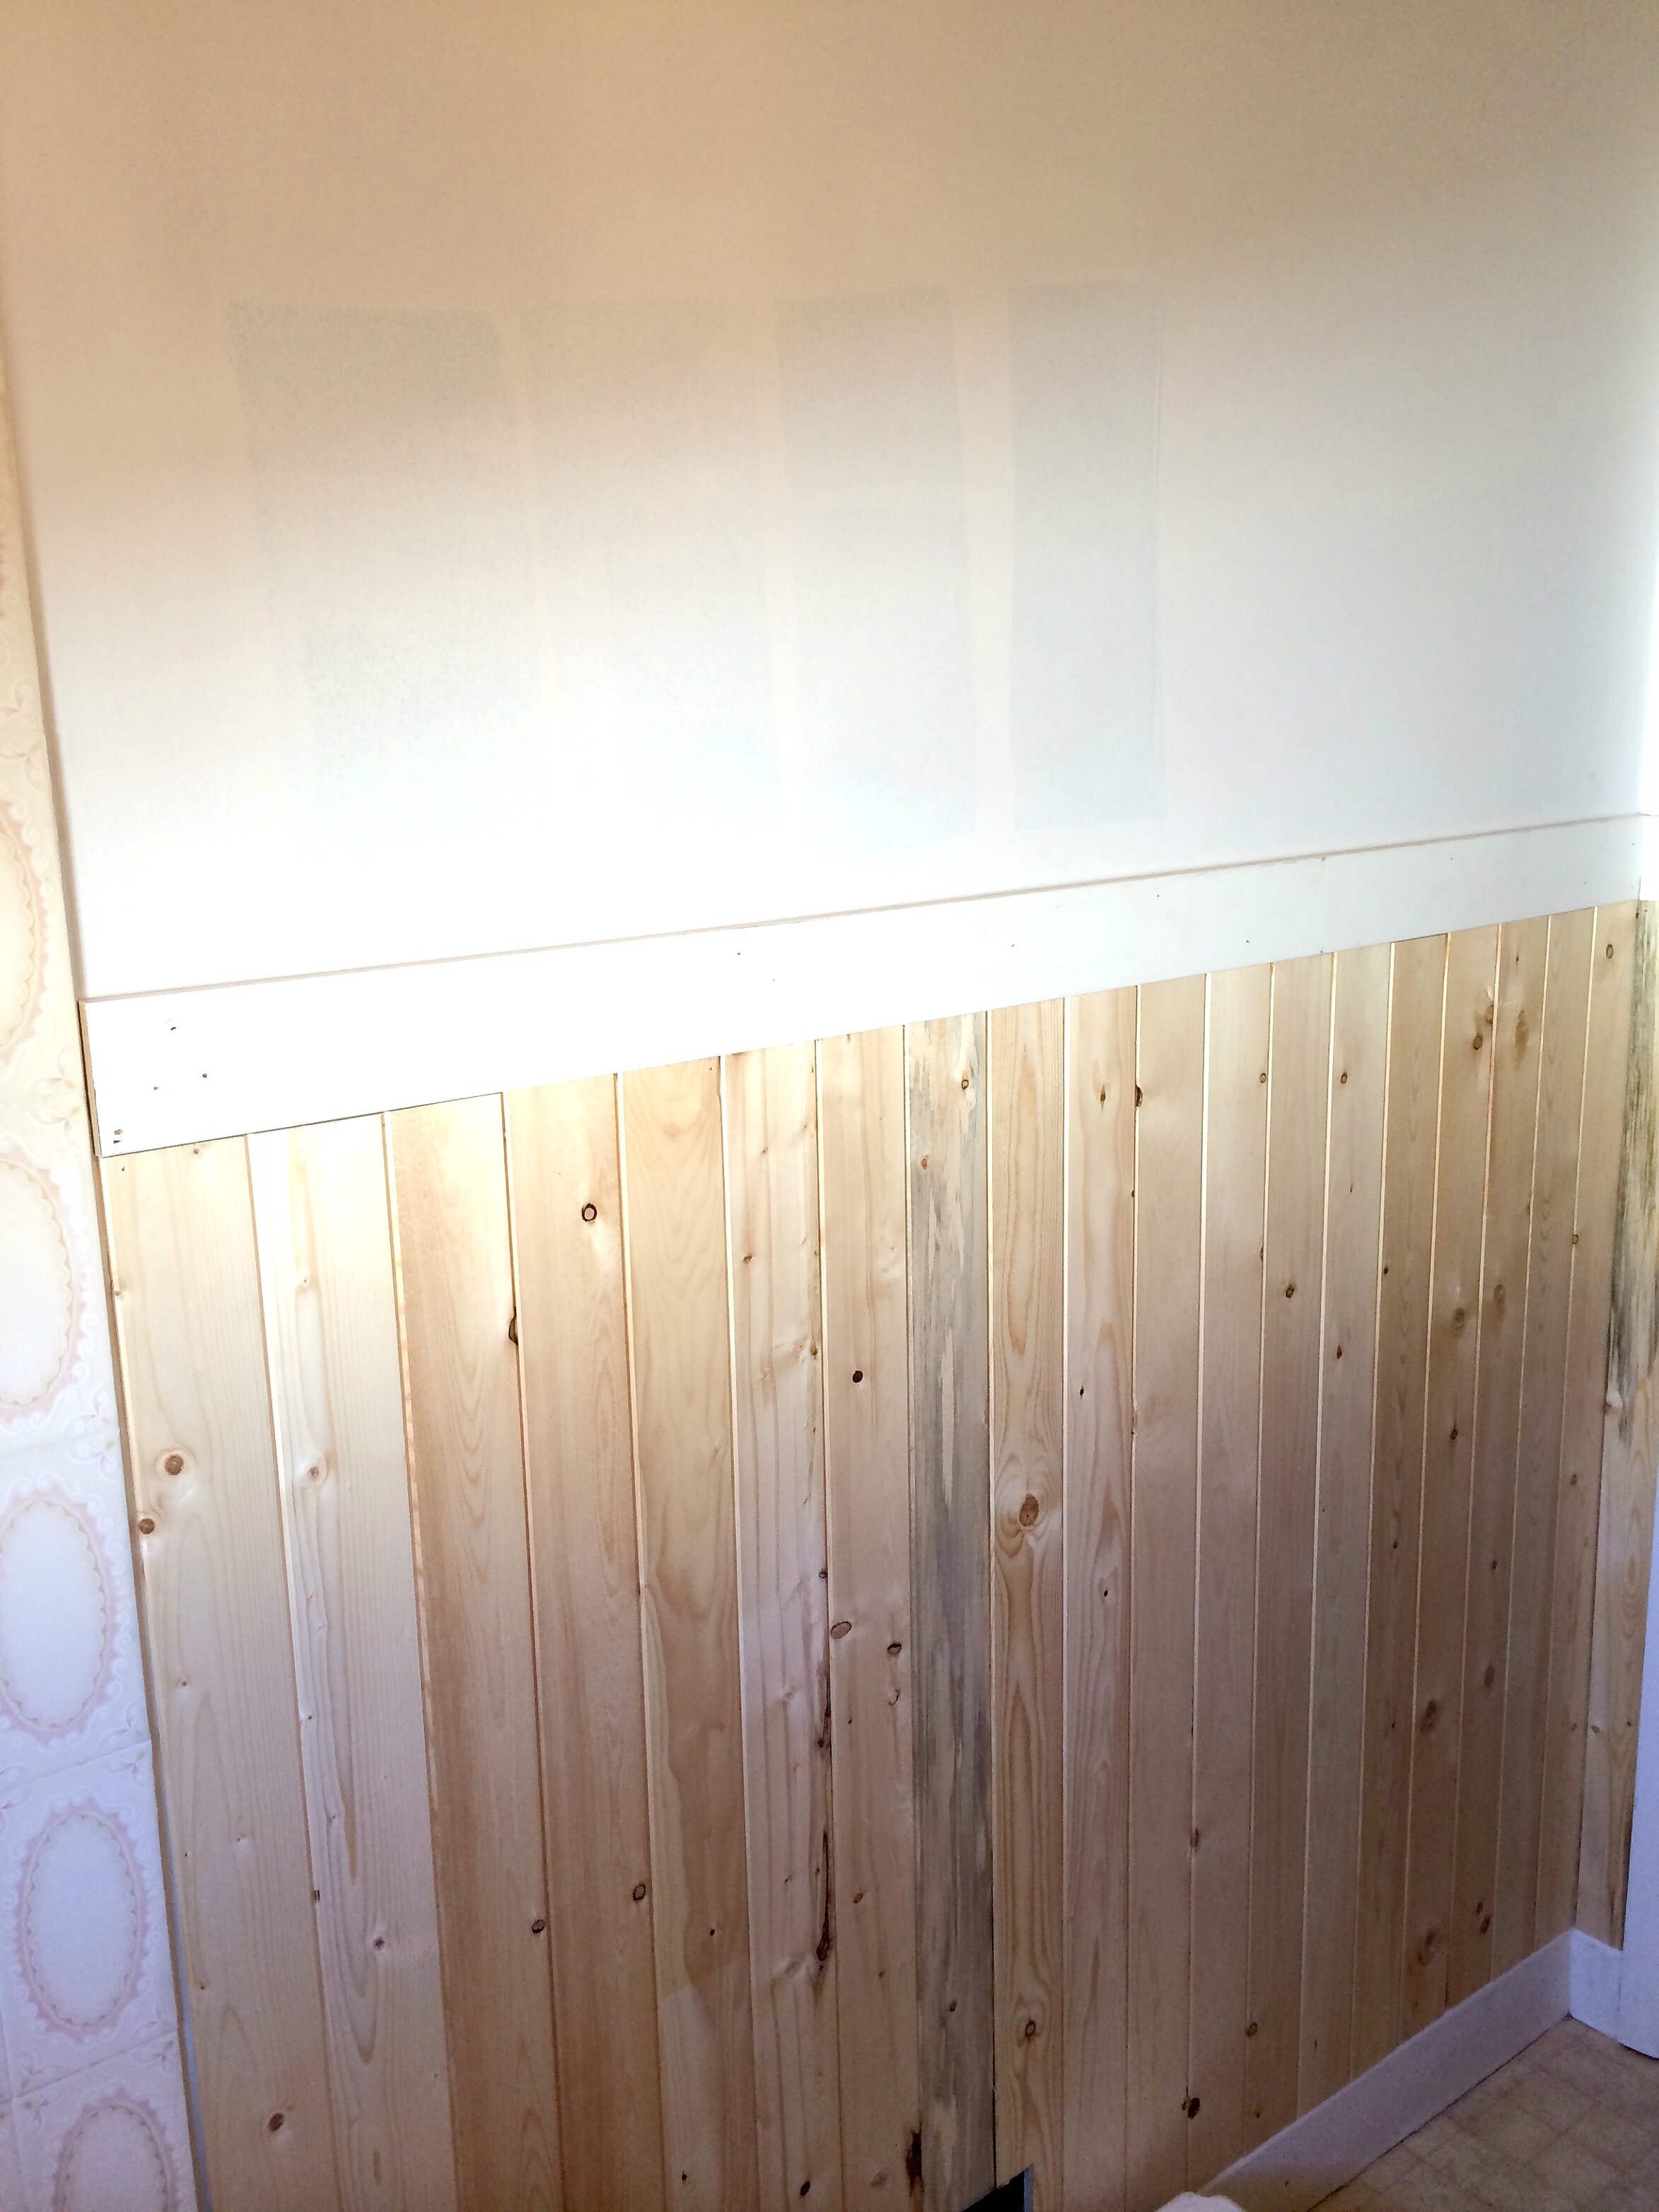
Last week I shared with you all that we had  removed the old tile around the sink and toilet, patched and primed the walls and ceiling and my husband had put up the pine wainscoting and mdf trim. This week I caulked around the trim and primed the wainscoting. If you’re curious, I used Zinsser 123 Primer, the one that says it’s designed for mildew protection. Painting wainscoting is a real pain because you have to use a brush to get in each and every last groove and knot, then go back with your roller over the entire thing. I worked in small sections of 4 or 5 planks at a time. Good thing we have a small bathroom! The hardest part was getting in and around the toilet. I did my best, but if we end up switching out the toilet, I will touch up any spots I couldn’t reach then. It still needs another coat of primer, followed by paint, but it already looks so fresh and clean! I love it!

primertrim

I got one coat of primer on the medicine cabinet. We also started trimming out the cabinet to give it a little pizzazz. We aren’t finished yet, we still need to add some trim just beneath the bottom shelf, but you get the idea of where we’re headed. Once it is all white it’s going to look so fresh!

cabinet trim

My husband used a brad nailer to attach the top trim pieces and No Nails adhesive glue to attach the trim to the mirror. The only problem we ran into was figuring out how we can add knobs to the fronts of the cabinets. I really had my heart set on these cute little white and silver “flower” knobs from Michaels. We thought it would be easy to drill through mirror, but as it turns out, it’s definitely not. You need to use a “diamond” bit on our drill, which is fine, but apparently unless you are very experienced it seems you are more likely than not to break the mirror. Not cool. I called around town and it was going to cost around $20 to get a professional to drill the three holes for us, but they said they couldn’t guarantee the mirror wouldn’t break. The whole point of remaking our existing medicine cabinet is to save money. So I don’t want to pay to have someone drill the holes for us, only to end up breaking the mirrors and needing to then replace them entirely. We brainstormed a few options for making it work, but in the end we are going with the easiest route – I have some very lightweight acrylic knobs that look like glass, but will be light enough to adhere to the trim with just glue. Or so I hope! They won’t be functional, we will still have to open the cabinet with the little hand notches on the bottoms of the doors as we have always done, but that’s no big deal. They will look pretty!

Last week I mentioned that I was contemplating ordering some vinyl because I didn’t want to spend a ton of time painting our old lino and I was worried about the painted floors holding up to the abuse our one and only bathroom endures! I think I knew which one was my favourite of all the options I shared last week, but I was looking for some confirmation, so I posted a picture to instagram. In the end my original choice, Filagree Iron by Mannington, came out the clear winner and I felt really good about my choice.

IMG_5831

Then I went to the store to order it. Originally I was told it should only take a couple of days to come in. Then I was told that since this is a new pattern it is currently still in production and the expected arrival date is… May 13. Womp-womp. So I can order it, but it won’t be here in time for the final one room challenge reveal date on May 12. I was really disappointed because I so wanted to finish in time! I even started contemplating other options. I did find one that could definitely work in the room.

IMG_5852

The grey and white plank “wood” would look cute with the grey and white birch wallpaper and painted wainscoting. I like it. Do I love it? No. Not when I compare it to my first choice. So as much as I would like to have a fully completed room by the final reveal date, I’ve decided not to settle and I will order my first choice. I think I will just do a quick coat of white or light grey paint on the lino in time for the final reveal. That way the yellowy beige lino won’t be screaming “look at how ugly I am” and taking away all the attention from everything else in the room that will be complete!

I found a sink faucet this week.

faucet

It’s by Danze, and it was on sale for $38 at Canadian Tire. I think the white handles add a cute little cottage touch, but the shiny chrome keeps it a bit glam. Cottage glam, that’s my jam! (Apparently geeky rhymes are also my thing;)

So, we obviously still have a lot of work left to do! This week I really hope we finish up all the painting, a well as the wallpaper. Overall though, I’m feeling confident that we will finish in time, other than the floors which won’t be here in time. (Unless a miracle happens!)

  1. Remove old tile surrounding toilet, sink and medicine cabinet. DONE
  2. Prime walls and ceiling. DONE
  3. Add wainscoting to lower half of walls. DONE
  4. Add trim, prime and paint and add hardware to medicine cabinet. STARTED
  5. Paint ceiling.
  6. Paint trim. STARTED
  7. Fill the really big knots in the wood, prime and paint wainscoting. STARTED
  8. Repair chipping grout, prime and paint shower tiles. Silicone around tub. GROUT REPAIRED
  9. Install window privacy film.
  10. Install wallpaper on top half of wall.
  11. Install new light fixture above medicine cabinet.
  12. Add shelf above door for extra storage???
  13. Install new sink faucet.
  14. Change out toilet. (I’m too cheap for even the cheapest one at Home Depot – $110 – but I think I can find a decent on at the ReStore for $50. I’m not too picky as long as it is just a basic white, round toilet in decent condition.)
  15. Prime, paint and stencil old lino floor OR buy new vinyl floor and install. (WILL DO QUICK PAINT JOB AS VINYL WON’T ARRIVE IN TIME)
  16. Choose fabric, sew and install sink skirt.
  17. Spray paint chandelier, buy battery operated candles, install.
  18. Sand and paint tree stump side table??? (I have serious doubts that I will get around to this in time!)
  19. Decorate! (Shower curtain, artwork, hooks for towels, toilet paper holder and other small decor items.)

Time to get busy!

Thanks again to Linda from Calling It Home, for hosting this fun challenge! Please check out the One Room Challenge featured designers progress here, and the guest participants here.

Kari

One Room Challenge Week 3 – Cottage Bathroom Progress

IMG_5792

How are we already at week 3 of the One Room Challenge? That flew by! The good news is that we have made some progress on the actual work that needs to happen, not just the design plan. So that’s a good thing, right? Hurray for progress!

If this is your first visit to Prairie Girl Home, you might want to get caught up by checking out week 1 and week 2 of our little bathroom makeover.

So what did we get done this week?

IMG_5709

We removed the old tile around the toilet, sink and medicine cabinet. My husband in his eagerness accidentally removed one of the shower tiles as well. I tell you, it was VERY difficult not to tell him to just keep going and take it all down! I was so tempted. The problem wasn’t that the tile was hard to remove – it wasn’t! The problem is that we don’t have the time or the money right now to replace it, or at least to replace it with what I would like. Isn’t it funny how these little renovations can quickly become an “if you give a mouse a cookie” situation! If you don’t know the children’s book I’m referring to, basically a mouse asks for a cookie, but then once he has the cookie he wants a glass of milk, and so on and so on until he has asked for so many things that finally he loops back around to asking for milk and cookies again. So I had to restrain myself and my desire to just rip it all down and start from scratch. This reno is all about working with a small budget and using what you have to create something beautiful! So the tile around the tub stays!

We did get two coats of primer up on all of the walls and the ceiling. We just used some leftover primer we had from another project, it didn’t cover as great as I had hoped, so I need to go over a few more spots again.

We also got the wainscoting up! Oh, and by we, I really mean my husband.

IMG_5792

He is completely in love with his work, and of course feels we should just stain the wood for a true “cabin” feel. Nice try, hun, but that ain’t gonna happen! He was only joking, he knows I looooove white. I like to ask what his opinion is, but fortunately he completely trusts me with pretty much all of the decor decisions around here, otherwise we would be living in a very dark house with a lot of stained wood, red and plaid! When we’ve finished a project, he usually admits that he didn’t trust my vision at first but that he loves the end result.

I really struggled with the decision about how high to make the wainscoting. It seemed everything I read online said to make it either 1/3 or 2/3 the height of your wall. Ours ended up at 4’9”, or just over half the height of our walls.

IMG_5791

I wanted it to be high enough that it covered the entire area behind the sink, as well as that little shelf at the bottom of our medicine cabinet. My husband said he thought it should clear the lightswitch. I thought it should be high enough that we could hang hooks that hold our towels from the trim piece, but still short enough that I could hang artwork just above the trim piece. So we ended up at this height. Now I’m just a little worried I made a mistake. I’m worried that it cuts the room in half and makes our walls look even shorter than they are. Well, quite honestly, we aren’t changing it now. I’m just happy that we have made some progress. Also, things always look so much better once they are painted and the room is finished. The middle of a project is never pretty!

We ended up having just enough boards to finish the wainscoting, so the ceiling will not be planked. It was only a maybe on my idea list, not a big deal. I’m really not too disappointed, maybe next time!

IMG_5793

I think our door needs another coat of paint. I used Benjamin Moore Onyx, colour matched in Behr’s semi-gloss interior. I painted all of our interior doors in this, but they have always look streaky when the sun is shining directly on them.

I also made a quick stop to one of my new favourite little thrift shops. I had picked up a frame there a few weeks ago, so I went back to see if they had another similar one. I found it’s twin! Check it out!

IMG_5794

The empty frame was $2 and the frame with the oil canvas was $10. I don’t care much for the artwork, I bought it just for the frame.  I’m completely in love with the ornate curvy details. I wasn’t planning on using gold, but it would pop against all the grey beautifully. We shall see. I may end up just spraying them white. Stay tuned. I will also need to DIY some art to go inside of them. I have a few ideas, we’ll see what I can come up with in time.

I also came up with another idea this week, but I really don’t know if I have enough time to complete it before the end of this challenge. I almost forgot about these old tree stumps we have in our garage, that I had planned on turning into side tables.

IMG_5796

They’ve been drying out for almost two years, but they still feel very damp. I’m not sure if that’s because they were sitting on the cold concrete garage floor or if it really just takes that long to properly dry them out. The bark has been peeled and we did start sanding them. They need a lot more sanding! I thought one would be cute right beside the tub, where the little white cabinet was. I love the storage cabinet, but it does take up quite a bit of room. I love the idea of a little stool beside the tub where we could set a little book and a cup of tea during a bath. Ah, sounds relaxing, right? I would probably paint it white, or maybe do a white wash, because that’s what I do – paint things white – but they would still look super cute and go with the birch wallpaper I have picked out. I’ll have to see if I have time to get to this little project.

I also decided to pop into a local flooring shop, just to see if they happened to have any remnant pieces that would go with my design plan. I still will probably end up painting the old lino floor with a stencil, like I originally planned, but I’m a little worried about durability. Not to mention it would save a lot of time to just have something new installed, which I’m assuming would only take a few hours at the most. Priming, painting, stenciling and then adding poly to our existing floors is going to be a big job, with lots of drying time required. Did I mention this is our only bathroom? Yikes. I’m not sure how exactly we’re going to handle that one. Quick drives to the corner gas-station? Begging the neighbours to use their washroom? Port-a-potty??? Hmm. I don’t think I really thought this idea through properly! Maybe buying a new sheet of vinyl is the way to go. The shop didn’t have any remnant pieces that I liked, but I did find some interesting options that we could order in.

IMG_5797 IMG_5798 IMG_5800 IMG_5801 IMG_5799

How completely gorgeous are those mosaic options? It’s almost exactly what I had in mind for a stencil! These are all from a company called Mannington. The patterns I have shown you above are called Filigree and Empire. They both have a few different colour options, but I think all of the ones pictured above could possibly work. I would need to bring in my wallpaper sample to see which option would be the best fit. I’m still not sure what to do, because while these are not insanely priced, we hadn’t planned on doing the floor as well. I’m just not sure I want to invest the time and energy and money into painting the lino when I’m really not sure if it will hold up to use!

So we obviously still have quite a few decisions to make, but here is how our to-do list is looking now.

  1. Remove old tile surrounding toilet, sink and medicine cabinet. DONE
  2. Prime walls and ceiling. DONE
  3. Add wainscoting to lower half of walls. DONE
  4. Add trim, prime and paint and add hardware to medicine cabinet.
  5. Paint ceiling.
  6. Paint trim.
  7. Fill the really big knots in the wood, prime and paint wainscoting.
  8. Repair chipping grout, prime and paint shower tiles. Silicone around tub.
  9. Install window privacy film.
  10. Install wallpaper on top half of wall.
  11. Install new light fixture above medicine cabinet.
  12. Add shelf above door for extra storage???
  13. Change out sink faucet. (I think I have decided on one that is affordable, but still keeping an eye out for anything used that might pop up.)
  14. Change out toilet. (I’m too cheap for even the cheapest one at Home Depot – $110 – but I think I can find a decent on at the ReStore for $50. I’m not too picky as long as it is just a basic white, round toilet in decent condition.)
  15. Prime, paint and stencil old lino floor OR buy new vinyl floor and install.
  16. Choose fabric, sew and install sink skirt.
  17. Spray paint chandelier, buy battery operated candles, install.
  18. Sand and paint tree stump side table???
  19. Decorate! (Shower curtain, artwork, hooks for towels, toilet paper holder and other small decor items.)

Hmmm, somehow my to-do list actually got longer, not shorter. Oh dear. Well, we will just have to see what can be done in the next three weeks!

Thanks for stopping by! I will be back next Thursday with more progress. Don’t forget to check out the progress of the featured designers and the other guest participants of the One Room Challenge over at Calling It Home!

As always, you can also follow along with progress updates over on Instagram, @prairiegirlhome.

Kari

One Room Challenge Week 2 – Our Cottage Bathroom Design

iphone april 13 337

Has it really been a week since this challenge started? That means there are only four weeks left to get this little bathroom reno of ours complete!

If this is your first visit to Prairie Girl Home you might want to start by reading last week’s post, where I explained what the One Room Challenge, created by Linda of Calling It Home, is all about. Basically it’s a blogging challenge where we all have six weeks to complete one room in our homes. Technically, it’s only five weeks of actual work, but there are six weeks of posts.

I really hoped to make a dent in at least some of our to-do list that I shared last week. However, this little thing called ”real life” got in the way of all my renovating and decorating plans! Don’t you hate when that happens? So the bathroom looks exactly the same as the pictures I shared last week. Oh, wait, we did take the towel bars down. That’s progress, right? What did happen is I made quite a bit of progress in nailing down the design plan.

Last week I shared a mood board of where I was heading with the design for our pink bathtub, pink sink, time-warp 1955 bathroom. The pink tub and sink are staying – so my challenge is to make that look somewhat intentional and not “we don’t have enough money right now to do a full renovation.”

design board our bathroomThe plan ended up changing a wee bit. I did warn you that might happen! I change my mind constantly when it comes to design decisions!

So some things are on track with how I originally planned them. First off – the chandelier! This was just a “maybe” on my want list, but when I found a steal of a deal on a local used site I had to jump on it! Check it out.

iphone april 13 316

Five bucks!!! How great is that? Maybe you’re thinking, ‘Uh, Kari, I wouldn’t have paid a single penny for that.’ Don’t worry. Once I get rid of the glass and spray it all black, I think it will be perfect when centered above the tub. We don’t have electrical in this spot, so it will just be decorative. I think I can somehow remove all the wiring and then I will rig up a way for it to hold some of those battery operated flameless candles. Which, by the way, are super expensive! At least the ones I found on Amazon are. I will keep searching, because there has to be some out there for less than $60!

Here is my kind hubby holding the chandy in place so I could have an idea if it would be a good fit.

iphone april 13 314Wasn’t that nice of him? He puts up with all of my crazy design ideas. As you can see, he’s a tall fella so we will hang it a bit higher. I’ve decided to move the shower rod up to ceiling height, so it won’t block the view of the pretty chandelier. I think the chandelier will make a great focal point, since it’ll be one of the first things you see when you walk in the door. Here was my very amateur sketch from last week, but you still get the general idea of where I’m headed.

bathroomsketch2.jpeg

In other developments, I realized that my tendency towards hoarding has reached new heights (or maybe depths, you decide). Between my office/craft room, basement and garage, I officially cannot remember what I have stashed and where. This should probably be considered a bad thing, but I’m going to count it as a win where the One Room Challenge is concerned, because after digging around I found quite a few things that will save us quite a bit of moolah! Yippee! I told you last week this reno is all about trying to do a lot, with very little.

I remembered that we still have some 4 inch pine boards leftover from when we planked the ceiling of our main living areas.

IMAG1387

That is awesome, because beadboard panels can actually be quite expensive.

I’m also kind of hoping we can do the ceiling in the bathroom while we’re at it as well. I mean, we already have the boards! I haven’t asked my hubby how he feels about that idea yet… he may not share my enthusiasm.

The thing I spent a lot of time on this week, as far as design planning, was wallpaper. Oh, wallpaper, how I do love thee. Seriously. I loooove looking at wallpaper samples! Here is where I struggled – I love ALL the samples and choosing just ONE was so hard! The thing about wallpaper is that it can be a bit pricey and it’s also a bit of a job to install, so you really want to LOVE the one you pick. I mean truly adore it. So I was on the hunt for a wallpaper in my price range (AKA as low as possible), but one that I loved and felt confident I would love for years to come. No pressure, right? Here are some of the ones I was admiring.


anewall.com floralvia anewall.com

This is the one from my inspiration board, but it was a bit out of my price range – especially once I factored in the US/CAN exchange rate, taxes, shipping and duty. Oh boy. Sometimes online shopping is just not as much fun for us northerners!

wallfloravia wallflorashop.com

This one from wallflorashop is positively gorgeous, but again – way out of my price range.

anthropologie floralvia anthropologie.com

Oh, Anthropologie. You are boho and vintage and classy and chic and modern all at the same time. Beautiful – but not going to happen this time.

farmhouseforfour bathvia farmhouseforfour on Instagram

This bathroom by farmhouseforfour on Instagram (amazing farmhouse – go check them out!) is so inspiring! I love the black and white floral wallpaper. It’s by JF Fabrics, but is ”open to the trade” only. Meaning a designer can order it for you, but little ole’ me cannot.

iphone april 13 289

I posted this pic to Instagram earlier this week. For a brief moment I was considering a pink toile wallaper, thinking that it would help tie in the pink tub and sink. Even though I’m only wallpapering the upper portion of the wall, I decided this would be a little too much pink. At least for me! I also liked the black and grey toile you see here on the left.

iphone april 13 303

This grey and cream floral is really gorgeous, but has a little too much cream for my taste.

iphone april 13 301

I considered both of these. The grey floral was just too much grey. I wanted something with a little more contrast between the white and the grey/charcoal or black. The black and white toile is beautiful, as well as a good price. I did seriously consider it.

iphone april 13 322

Now this pretty white, off-white and grey floral was a real contender. I can’t find the link online, but it’s from the book English Florals, Traditional Wallcoverings. Here it is against my pink tub, along with my charcoal and white striped turkish towels and a grey curtain panel that I totally forgot I had! It makes for a nice combo though. When I saw all of this together it really helped me see that I wanted a much softer grey palette than I had originally thought. I think the grey and the blush pink combo will be very pretty and sophisticated.

My dilemma was that while I liked this wallpaper a lot, I didn’t really love it. I definitely didn’t totally adore it!  Also, because it is only sold in double rolls (majority of wallapers are), I would have to order 4 rolls to do my tiny bathroom, even though I think I only need slightly more than 2. Which was going to be…. $200 plus tax. Yikes! I was kind of hoping the entire bathroom reno could be done for $2-300. So this was out. I was also a little worried about ordering time. The store I was ordering it through said it would take 3 weeks. I was cutting it too close! So I decided to take another look at what I could find in stock. No ordering involved.

Home Depot and Lowes didn’t turn up anything I loved that went with my design plan. So I tried Bouclair Home. I found this.

iphone april 13 338

Cute, right? It had all the colours I was searching for – a clean white, grey and charcoal. I know the birch tree theme is quite popular, but you know how I feel about popular trends? If you love a trend, go for it! If you don’t, then don’t! Just do what you love. That’s all that matters in the end. It’s your house! I think the birch trees will go nicely with the cottage theme I have going, but the sophisticated colours still leave a lot of room for me to “glam it up”! Oh, and did I forget to mention the price? Only $35 per double roll. Remember, the wallpapers above I linked to were priced mostly in single rolls. Which means a double roll is double the price! So this one is really only $17.50 per single roll. I may have to go back for another roll, but if my calculatons are right, it’s going to be close. So the total wallpaper budget may be just this one roll at $35.

I have also been looking at lights to go above the vanity. I found a cute one at Lowe’s.

iphone april 13 327

They were out of stock, but that’s okay because I think I can do better than $65. There is a similar one on amazon for $40, but again, I’m worried about it shipping in time.

I also shopped the outdoor lights at Lowe’s. No, not for our home exterior, for the bathroom. When the kind little teen boy there asked if he could help me and I said I was just looking for a light for our bathroom, he kind of giggled and kindly told me the vanity lights were in another aisle. I’m sure he thought this poor lady has no clue what she is doing! But seriously, outdoor lights can go anywhere! Sarah Richardson says so, and she is my decorating diva, so it must be so!

Look what I came home with.

iphone april 13 337

The exterior lantern light you see here on the right is so cute! It looks way better up close than it did in the box. I think it was $45. The simple one light candle sconce is also very adorable, and was $26. I like them both, but I think I’ll keep an eye out for anything used that might pop up. Spray painting light fixtures is so simple and a great way to update an old gem that someone else might just pass over as being too outdated.

The charcoal “silk” curtains you see on the far left are another hoarding item I forgot I had. They are long enough to hang from floor to ceiling, so I think they will make a great shower curtain, to frame the tub and the pretty chandelier.

The small white and grey towel is actually a tea towel from Walmart. I think they could work as a cute hand towel!

That adorable little hanging wire magazine basket is yet another hoarding find. I bought it at Target a couple of years ago. Back when we still had a Target. (Insert sad face emoji here). May you RIP Target Canada. I miss you and I loved you, even if your shelves were often empty.

The other decor items are things I just grabbed from around the house. Overall, I really love the direction this is heading! Now we really have to get cracking on the actual work! Wallpaper shopping was a blast, but we’re going to have to start getting our hands a little dirty. Hopefully we will have a decent amount of progress to show you next week! Thanks for stopping by, and be sure to check out the featured designers of the One Room Challenge here, as well as all the guest participants here. You can also follow me on Instagram – @prairiegirlhome if you would like to see more updates on how this little reno is going! I’ll be back next Thursday with more room progress!

Kari


One Room Challenge Week 1 – Our Cottage Bathroom Makeover

design board our bathroom

Even though I set up Prairie Girl Home a couple of months ago, I was putting off publishing my first post. I was letting all of my fears hold me back from doing something I have wanted to do for a very long time. That ends today! So here it is, my first post! I have decided to join in on a fun blogging challenge that’s happening right now. You may have heard of it before.

static1.squarespace.com

The One Room Challenge was created by Linda of Calling It Home. The challenge takes place every spring and fall and this is it’s tenth season. The idea is to transform one room in your home over a period of six weeks. There are twenty featured bloggers, you can check them out here, and continue to see their progress posted every Wednesday up until their final room reveals on May 11th. Anyone else with a blog is invited to join in on the challenge as well! You can follow along with all of the guest participants (so far it looks like there are well over 200 of us) at Calling It Home every Thursday, to see the weekly progress posts and the final room reveal on May 12th.

We bought our 1955 fixer-upper in July of 2014 and we have been slowly working our way through the main floor, making it our own. I would call my decorating style “cottage with a touch of glam”. The living room, dining room and kitchen have all been given quite a bit of attention. I’ll share those with you soon, but if you would like a little peek in the meantime, feel free to check out my Instagram page, @prairiegirlhome. For this challenge though, I plan to give our one and only, tiny bathroom a makeover. The room is 7’10” by 4’10”, but it also has a little jut-out that houses our chimney, making the room even smaller. I won’t complain about the size though, because I know that much smaller bathrooms do exist. We lived with one in a previous rental!

We really haven’t touched this room yet. So here is how the bathroom looks today. I’m almost embarrassed to share these, but oh well. The worse the before is, the better the after will be, right? Are you ready???


No, there is nothing wrong with your screen. That’s a pink tub. Oh, and yes. The sink is pink as well. It’s really showcased so nicely with the beige and soft pink tile, don’t you think? The yellowy beige linoleum floor might be the real showstopper. Are you jealous yet? Also, since that shabby-chic, chippy paint look is so popular right now, I figured the window trim might as well keep on peeling! Oh, the grout that has chipped away? I call that character. The caulk that has almost completely come away from the tub? Okay, that’s pretty bad. I have no excuse. Did I scare you away yet? Don’t worry. It will all be fixed soon!

I am sure it was extremely hip to have a pink tub and sink back in 1955. I think the tile was added some time later, since you can tell they did some creative cutting to work around the faucet, sink and medicine cabinet. The window is original to 1955. We did change out the hand-held shower head. I found a used one for 10$ on a local used site. That’s my kind of price!

The medicine cabinet does actually help with the problem of it being a small bathroom with no real built in storage. It does need a little lovin’ before it can be called pretty! Oh, and yes. Those are my paintbrushes you see there on the right. Now you know all my dirty little secrets! We don’t have a utility sink or anywhere else I can clean out my brushes, other than the kitchen sink – so the bathroom it is! I just stash them on that little hook there to dry because it’s easy. We have been using them a lot lately! Ah, the life of a DIY addict.

The little marble topped white cabinet was a gift from my mom. It really does help with the storage problem.  We also added that little corner shower shelf unit. The door is just a flat hollow-core door, but I painted it Benjamin Moore’s Onyx, along with all the other doors in our house. I think it gives them a touch of glam. I love them! The doorknob is also original, and I sprayed it gold using Rustoleum’s Metallic spray paint. The shower curtain is the same one we received as a wedding shower gift over 10 years ago. For a girl who loves to decorate and is constantly changing things, I can’t believe I’ve never felt the need to try a new shower curtain! It just proves that white is always a classic choice. You can also see here that I have a few paint samples up. I put those up last week when I bought four samples to try in our master bedroom and decided I might as well try them here.

Isn’t it gorgeous? (Insert sarcasm here). Okay, the door isn’t bad. We did upgrade the light switch. The mess of paint colours on the wall is from me. Every time I come in here to clean out a paintbrush I think – hmmm…. I wonder how this colour would look on the wall? So I give it a try. Then I do this over and over. Until the wall looks like our four year old took his paints and went crazy in here. Except I can’t blame him because he isn’t even tall enough to reach up there. It’s all me. Guilty as charged.

So what the room really needs is a sledge-hammer. I would love to give it a gut-job, right down to the studs and remake the room from scratch. However, we simply don’t have the cash for that right now. So this makeover challenge is going to be all about making this room as pretty as possible, for as little money as possible! I’m actually excited about the fact that our budget is forcing me to get creative and really think outside of the box to look for ways to improve this room, while working with what we have.

Here is a design board I made up to give you an idea of what I’m going for. Please keep in mind that I reserve the right to change my mind and go in a completely different direction at any time! Also, nothing you see here is the actual item I will be buying, since hey, budget makeover!

design board our bathroom

I also drew up a couple of very rough sketches to help visualize some plans. Disclaimer: I am definitely not an artist, so please go easy on me! I wasn’t going to include them, but I decided that blogging is all about sharing the entire process. This is what helps me get from point A to point B.

bathroomsketch.jpeg

Yikes, they look a lot worse now that I’ve scanned them in! Okay, I’m pushing through my desire to hit delete. They still help give you a good idea of the goal here.

bathroomsketch2.jpegYes, the pink tub and sink are staying! I know they make epoxy paints designed to go right over tubs and sinks, but I’ve read they are very stinky, take forever to cure and they cost around 50$. I think we can work with the pink, save ourselves the 50$ and still end up with a cute bathroom – or so I hope! The plan is to add lots of white and black to glam up this time-warp pink bathroom. We’re also adding beadboard and other cottage touches so it flows with the rest of our house and style.

Here is a list of what I would like to accomplish, not necessarily in this order, with this room before the May 12th deadline in five weeks!

  1. Paint all of the existing trim.
  2. Add beadboard to the bottom half or 2/3 of the wall and paint it white.
  3. Paint the ceiling and the walls above the beadboard. (I was originally thinking of going nearly black or charcoal but now I’m wondering if I could possibly find a black and white floral wallpaper that isn’t outrageously priced? OR possibly freehand a very simple floral pattern? OR I may just end up going with classic white, there might be enough going on visually in this very small bathroom!)
  4. Repair any chipping grout and paint the shower wall tiles white.
  5. Install window privacy film – I’m sure our neighbours will thank us;)
  6. Add basic mdf trim painted white around the three mirrored doors on the medicine cabinet, add knobs and maybe some corbels underneath to give it a shaker-style, cottage makeover.
  7. Paint the linoleum floor and hopefully DIY something that looks similar to the cement tile you see in the mood board above. Stencil maybe? Freehand? This all depends on what I decide to do with the walls. It’s a small room and while I’m not afraid to mix patterns (I think a floral and a mosaic tile could work together as long as one is a larger scale than the other) – it may just end up being way too much in this tiny space!
  8. Sew and install a sink skirt. I’m thinking a heavier white cotton material, maybe with gathers or pleats?
  9. Sew or buy a new shower curtain – I would love to have two curtains hanging to the floor that would frame the window.
  10. Upgrade light fixture – did you see the before? Yeah. This needs to happen now, I don’t think we can wait. Hopefully I can find something used that is awesome, or DIY something, or possibly even use an outdoor fixture, since those are usually more affordable than interior lighting. We won’t be changing the location of the fixture.
  11. I would really love to find a used chandelier or some sort of candelabra that I could hang above the tub, in front of the window. It wouldn’t be wired in, it would just be for interest. Possibly it could have those battery-operated candles?
  12. Add a shelf above the door for extra storage
  13. Upgrade faucet??? Only if we find a great deal on a used one or a fantastic sale.
  14. Change out the toilet??? Not a priority, but for several reasons I really hate the one that’s there. Without getting into a lengthy explanation – I would just like a normal height, normal sized, white, round toilet! You hear what I’m sayin’? ;);)
  15. Decorate! Add some pretties!

Whew. That’s quite a list now that I look at it. I’m a little tired just thinking about it, but it will be so worth it once it’s complete! I am hoping the One Room Challenge will keep me on task (I have a habit of hopping around from one DIY to another!) and force me to finish on time. Even if we don’t end up crossing every single item off of the list, I will still call it a success! Anything we do will make the room better than how it looks today!

Thank you if you read this entire post! I’m really excited to start this room makeover and I hope you’ll come back to check in on the progress. I’ll be here every Thursday with updates and don’t forget the final room reveal will be on May 12th!

Thanks to Linda of Calling it Home for hosting this fun challenge and for inviting even total newbie bloggers like myself to join in!

Kari

P.S. Follow me on Instagram, @prairiegirlhome if you would like updates in real-time on this little bathroom makeover!